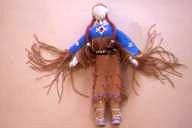
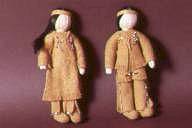
This adorable native american corn husk doll makes an easy and entertaining kid’s craft project and is also fun for adults decorating with Thanksgiving craft projects.
Age Appropriate: K-6
What you’ll need to make a cornhusk doll:
9-12 pieces of green corn husk
String or twine
Decorative pieces
Scissors
Bowl of water
Glue
Use green corn husks
 Hopi corn husk doll |
The corn husk you use to construct your doll should be green and not dried. Green corn husk can be purchased from any craft store. You can also use green corn husk you peel from a corn cob yourself. If you must use dried husks, before beginning the construction phase, soak all corn husks in a large bowl of warm water to make them more pliable. Corn husks which are purchased or fresh can be treated in this manner also, though it isn’t usually necessary.
INSTRUCTIONS:
1. Take a small handful of husks and bunch them together so that they are of equal length. Once this is done, use twine or string to hold them together. Approximately 1/2 inch from the top of your husks, wrap two layers of twine and knot tightly. This will serve as the body for your doll. Once you’ve completed this step, set aside.
2. Take 1 or 2 small pieces of husks and roll them together to form a ball. (If husks are too dry or stiff, soak them for about 30-minutes in a large bowl of warm water.) This “ball” will serve as your doll’s head, so you can play with its size until you are satisfied you’ve created the look you want.
 Iroquois Corn Husk Doll |
3. Once you have the right size for your head, take a single piece of husk and drape it over your head, gathering the two loose ends at the base of the head. Pull the single piece of husk tightly around your ball (so that you can draw or design a face on it later), and twist the loose ends once and tie tightly with a single piece of twine. Set aside.
4. It’s time to make arms. Grab your first group of husks (which you’ve already tied together on one end in step 1). From the loose end, gather one husk and pull upward (as if peeling a banana). Cut two small pieces of twine. Use one piece of twine to tie the arm off near the center stalk of husks. (This will help to keep it separated from the body of your doll.) Use the other piece of twine or string to tie the loose end of the husk, forming a wrist for your doll. Repeat on the other side so that you have two distinct arms on your doll. If the arms appear too long or disproportionate, cut the husk to the proper size or find a husk more to your liking.
 Sioux Corn Husk Doll |
5. Take your dolls head and position it on top of the body so that your two loose pieces of twine drape themselves over the neck of the doll. Using a small piece of string or twine, attach the head to the body. (If the head does not seem to want to stay in place, you may dribble a small amount of glue on the underside of the head before securing it with twine to the body or add a pipe cleaner to it. Allow glue to dry completely before proceeding.)
6. Take a small piece of twine and tie a waist on your doll. It will be located near the center of your stalk of husks. Tightly knot the string or twine.
 Apache corn husk dolls |
7. To make the legs for your doll, split the husks which have not yet been tied off, in half. (Right below the waistline you’ve just made.) Use several small pieces of twine to tie off the legs on each side. Make one knot just below where the legs separate and a second knot near the foot of your doll. Repeat on the other side until you have formed two distinct legs.
Decorating your doll
Traditionally, an Indian child would fashion clothing for her doll similar to what was worn by her own culture. Hair would be made from horse hair or animal furs. The doll would have no facial features. To learn why, read the Legend of the No Face Doll.
 Papago corn husk dolls |
However, you may decorate your own corn husk doll however you like. Small children will be able to decorate with colored construction paper, crayons and markers. You can attach paper clothing, jewelry, facial features and other items with a small dot of household glue. Older children can make clothing from fabric, additional pieces of corn husk or many other items.
Facial features, such as eyes, ears, noses, and mouths can be drawn on with permanent markers or crayons. Craft eyes, yarn mouths, and more can also be attached to your doll with glue.
Modern decorating ideas:
MAKE A SKIRT for your corn husk doll out of a fresh piece of husk. Simply wrap around the waistline and tie off with a piece of twine or colored yarn. You can decorate your skirt beforehand with markers or crayons.
COLORED YARN can be bent in the shape of a smile or ears and glued into place for instant facial features on your corn husk doll.
COLOR YOUR CORN HUSKS by soaking them in food coloring to make colored clothing or skin for your cornhusk doll. Soak husks for thirty minutes in a large bowl containing warm water and several drops of your desired color. To make vibrant browns, soak husks in a large bowl of coffee or tea.
MAKE SHOES by dipping the feet of your corn husk doll into a small bowl of acrylic paint. Allow to air dry and repeat, if necessary.
USE SMALL DOLL CLOTHES to decorate your corn husk doll.
SEQUINS, BUTTONS, GLITTER and other craft supplies can be glued to your corn husk doll to make jewelry, eyes, colored clothing and more.
INSERT A PIPE CLEANER into the back of your corn husk doll to put it on display, help it bend into a variety of positions, or to hang it.
 Klamath Corn Husk Doll |
INSTANT HAIR FOR YOUR CORN HUSK DOLL can be made with more corn husks, or corn silk, yarn, or twine. Attach with glue.
WATERCOLOR PAINTS will soak into corn husks, and give a deep, rich color to your doll.
A DOLL HAT can be made from a plastic bottle cap.
A PERFECTLY ROUND HEAD can be made for your corn husk doll by placing a few cotton balls inside a piece of husk, instead of rolling husks. Decorate first, and then attach to the body using the above instructions.
RELATED ARTICLES:

